Initiating referrals
Before you create a referral letter, you first initiate a referral for the patient. When you initiate a referral, you specify referral details such as the:
Referral type and urgency
Consultant, clinic, or facility where you are referring the patient
Referral reason
These details automatically populate within your referral letter and help you track and manage the actions you will take towards the referral.
Steps
| 1. | Initiate a referral from one of the following areas of the EMR: |
From any window related to the patient (including a patient’s medical summary, SOAP form, consult letter form, or Patient tab), right-click and then, in the SMART menu, click New Referral.
Within a SOAP note, click Create Referral.
Within the front-end staff WorkDesk, click New Referral.
From a consult letter, click Detailed Referral.
The New Referral window opens.

| 2. | If you created a visit note for the patient today, when prompted to “Use current visit record to build referral letter?”, perform one of the following actions: |
To include your visit notes in the referral letter, click Yes.
To start a blank referral, click No.
| 3. | In the Referral Type list, click the type that best describes the referral reason. The default is Consultation. The EMR filters the consultant list to only ones categorized for the selected type. |
Want more Referral Type options?
Users with administrator authority can add, modify, or delete referral types. From the Wolf EMR Home tab, click Configuration![]() . From the View menu, choose Physicians /Service Providers > Referral Types. For more information, see Configuring referral types.
. From the View menu, choose Physicians /Service Providers > Referral Types. For more information, see Configuring referral types.
| 4. | Define the Urgency of the referral. Routine is the default. |
| 5. | Search for and select a consultant. |
| a) | In the Search for Consultant area, choose how you want to search: |
From Favourites: To view a list of your favourite consultants. For more information about this list, see Managing your favourite consultants.
By Speciality: To filter the consultants by specialty.
By Name: To view all the external consultants in alphabetical order. consultant list
Add New Consultant: To add a new consultant to your consultants list. See Managing external consultants while initiating a referral.
You can configure which default consultant search option is selected by default in your WorkDesk. From the WorkDesk menu, choose Configure > Configure Workdesk![]() and click the Referrals tab.
and click the Referrals tab.
Beside Default view of consultants or Search for Consultant Last Name only, clear the Apply clinic Setting check box, and then select the User Setting check box or an option.
| b) | In the Search field, type the consultant’s last name, or when searching by specialty, type or choose a specialty from the list. |
To add additional search criteria, press the space bar, and type the consultant’s first name, specialty, practitioner number, or city (municipality).
To search for consultants that contain ALL keywords you type, click AND.
To search for consultants that contain ANY of the keywords you type, click OR.
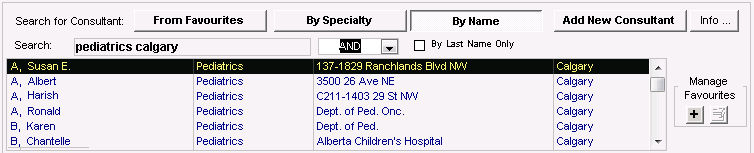
Tip: If you only want to search only by consultant last name, select the Search by Last Name only check box.
| c) | In the list of matching consultants, click the consultant you want. |
An E next to the name indicates that the consultant is set up to receive eReferrals. For more information, see eReferrals.
What if I don’t know what consultant is available?
If you do not know the consultant you want (for example, if you do not know which specialists are available), you can instead select a generic specialist. Search for and select “Next Available Specialist”.
You or your referral clerk can change the consultant’s name in the referral at a later time.
If there are notes entered for a consultant (such as booking procedures), they appear when you hover your mouse over the name.

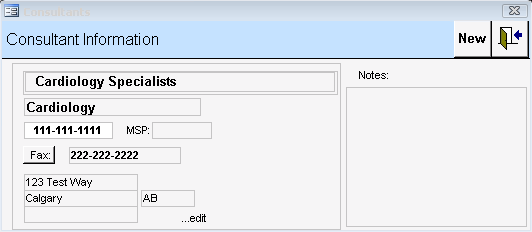
| 6. | To see the consultant’s full information, on the top right of the window, click Info.... |
| 7. | To choose the selected consultant as the primary recipient for the referral, click Set Primary. The EMR displays the consultant’s name in the field below the consultant list. |
Tip: You can choose only one primary consultant. To change the primary consultant, click another name and click Set Primary again.
| 8. | If you want to send a copy of the referral letter to another consultant, click their name and, next to Cc Recipients, click Add. |
| 9. | Use the following table to enter information in the rest of the window: |
| Field/Check box | Information to be entered |
|---|---|
|
Visited for same issue before |
Select if the patient was previously seen by a provider from your clinic for the same referral reason. In the Referral MD drop-down list, click the provider that the patient saw. Your name displays by default. |
|
Referral Reason |
Enter the reason and or diagnosis for the referral. This field is mandatory. |
|
Current Investigations |
Enter any investigations you are awaiting results on (including investigations that you ordered today). |
|
Booking Notes |
Enter notes regarding the appointment booking. This information appears in the Notes column in the front-end staff’s Referral Appointments to be made list. |
|
Consultant Will Notify Patient of Appointment |
Select to indicate that the patient will be notified of the appointment time by the consultant’s office. If you know it, enter the date and time of the appointment in the Appt Date/Time field, using the format: DD-Mmm-YYYY HH:MM AM/PM. The EMR immediately adds an item to your front-end staff’s Patient’s to Notify list. Your staff then know to call the patient to indicate that they can expect a call from the consultant’s office. If selected, the patient does not appear on the Appointments to be Made list. |
|
MSP Referral Sent |
Select if you want to send the referral billing to MSP. (This is a no charge fee referral 3333.) When you save the referral, the EMR automatically creates a bill with the patient's name, fee code, and the specialist’s name to whom the patient is referred. If you do not send the referral billing to MSP now, you can send the referral billing to MSP later, from the Appointments To Be Made window: 1. On your WorkDesk, click <x> referral appointments to be made. The EMR displays the Appointments To Be Made window. 2. In the list of referral appointments to be made, click the referral that you want to send to MSP for billing. The EMR displays the referral details in the right pane. 3. In the right pane, select the Billing Referral Sent check box. The EMR displays the following prompt “Send Referral to MSP?” 4. Click Yes. |
|
Use Medical Hx |
Select to includes the patient’s medical summary information in the referral letter. This is selected by default. |
|
Referral Status |
Specify the status of the referral, so that staff can track and update it in the Appointments To Be Made (see Managing referral letters). |
| 10. | If you do not want to create a referral letter at this point: |
| a) | Below LETTER COMPLETED, select the Letter check box. The EMR adds the patient to your Letters to Write list so that you can complete it later (see Managing sent referrals). |
| b) | Click Save & Close Referral |
| c) | If you did not select the MSP Referral Sent check box, the EMR prompts you to “Send Referral to MSP?”. Perform one of the following actions: |
If you want to bill MSP for the referral, click Yes. The EMR automatically creates a bill with the patient's name, fee code and specialist’s name to whom the patient is referred.
If you do not want ill MSP for the referral at this time, click No.
| 11. | Proceed to creating the referral letter, as described in Creating and sending referral letters. |
© 2018 ![]()