Monitoring clinic traffic
You can monitor clinic traffic to indicated that a patient has arrived, moved to an exam room, and that the encounter has finished with appointment statuses.
Using the Clinic Day View, you can keep track of:
Patients who have appointments for today, but have not yet arrived (Appointments area)
Patients who have arrived and are waiting for a room (Patients Waiting area)
Which exam rooms are occupied, by whom, when the patient was moved to the room, and with which provider (Exam Rooms area)
You can indicate that a patient has moved to an exam room and, if rooms are configured, you can also indicate the room number (see Configuring exam rooms).
Tip: Use the Refresh button at the top of the scheduler or press F5 to refresh your screen. You can also set up automatic refresh; 5 minutes is recommended when multiple people work in the same scheduler (from the User Preferences menu, choose Refresh Interval).
Steps
| 1. | To indicate that a patient has arrived: |
| a) | In the scheduler, right-click the appointment and click Arrive or press Ctrl+A. |
The Verify Patient Details window opens for you to verify that the information is correct.
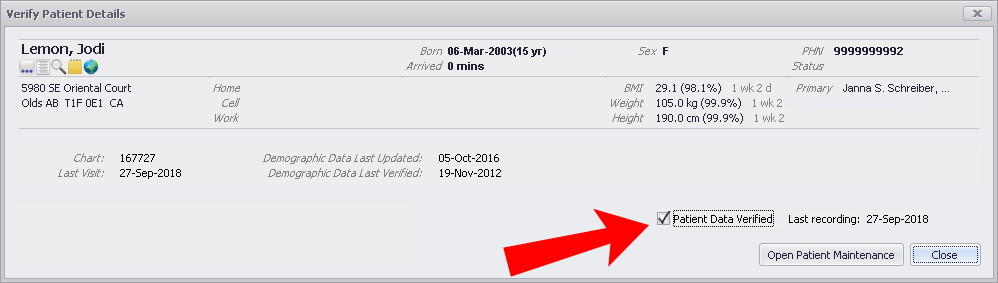
| b) | Verify the patient's PHN and demographic information with the patient. |
| c) | If changes are needed, click Open Patient Maintenance to update the patient’s information and mark the patient's information as verified (see Verifying patient data). |
| d) | If the information is accurate, select the Patient Data Verified check box. Today's date is entered. |
| e) | If needed, verify the patient’s PHN with MSP (see Verifying patient PHNs with MSP). |
| f) | Click Close. |
The EMR inserts an A before the patient name in the scheduler, to indicate that the patient has arrived.

| 2. | From the Appointments menu, choose Clinic Traffic (or press Ctrl + J on your keyboard). The EMR displays the Clinic Day View window. |
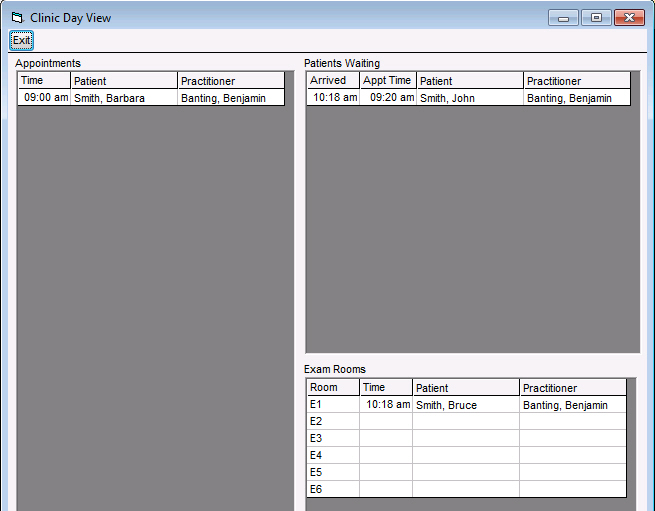
Note: The Clinic Day View contains read-only information.
| 3. | To indicate that a patient has moved to an exam room (if rooms are not configured), in the scheduler, right-click the appointment and click In Exam Room. The EMR inserts an E before the patient name, to indicate that the patient has moved to an exam room. |
| 4. | To indicate that a patient has moved to an exam room (if rooms are configured): |
| a) | In the Clinic Day View window, in the Exam Rooms area, check to see which rooms are available, and then click Exit. |
| b) | In the scheduler, click the appointment, and then on the Appt menu bar, in the Exam Room list (beside the Arrived button), click a room. The EMR inserts the room number before the patient name, to indicate that the patient has moved to that exam room. |
| 5. | To mark an appointment as finished, in the scheduler, right-click the appointment and choose Finished. The EMR inserts an F before the patient name, to indicate that the appointment is finished. |
Note: A provider can mark the appointment as finished when they close their notes. Providers can also automatically change the status to Finished when exiting a patient encounter (see Setting clinic-wide preferences for appointment schedule actions).
Tip: If you unintentionally change the appointment status (Confirmed, Arrived, In exam room, or Finished) and want to revert back to the previous status, right-click the appointment and click Reset Appointment Status.
For example, you confirmed an appointment, and set the status to Arrived when the patient came in. However, you then set the status to In Exam Room, but you hadn’t assigned an exam room and the patient was still in the waiting room. To fix this, you would right-click the appointment and click Reset Appointment Status. The status would revert to Arrived.
© 2018 ![]()