Setting clinic-wide preferences for appointment schedule actions
Administrators can customize your clinic’s general hours and other general behaviours of the scheduler for all users in the clinic.
Steps
| 1. | From the Wolf EMR home tab, click Configuration |
| 2. | Click the Appointment Configuration tab, and then enter information using the following table as a reference: |
| Field | Description |
|---|---|
|
Office Open |
Determines when you can set clinic hours for each appointment schedule. You can set time definitions only for times within the Office Open hours. Enter times using the 24-hour clock (such as 17 for 5pm). From: Enter the earliest possible time your providers or resources will begin to take appointments. Up To: Enter the latest possible time your providers or resources will take appointments up to. Don't forget to consider after-hours walk-in appointments. For example, if you have 15 minute appointments and you set the Up To time to 14:00, your last appointment time will be 13:45. If you want to have an appointment time at 14:00 set the Up To time to 14:15. |
|
Use Priority for Schedule |
Select to enable the use of Priorities on appointment schedules. For information, see Appointment priorities. |
|
No Show Warning |
Shows a warning when you mark a patient as Arrived if the patient has had a set number of no shows during a set number of months: Display Warning if: Enter the threshold number of no shows for which you want a warning. 'No Show' in last months: Enter the number of months for which you want to look back in the patient's chart for no shows. |
|
Confirm all appointments |
Select to automatically display all booked appointments in the Appointment Confirmations list (Patients > O/S Appt Confirmations). If not selected, only patients flagged as “confirm appointments” appear in the list. This option enables booking staff to have a “trackable” list of patients to contact (to confirm appointments) each day. |
|
Prompt to Create Bill when Cancelling an Appointment |
Select to prompt you to create a bill (to the patient) when you cancel an appointment. |
|
Use Appt Log |
Select to maintain a log of non-patient appointments (such as for drug reps and meetings). |
|
Use Multi-Resource |
Select to enable booking of a provider and multiple resources at the same time in the Appointment Detail window. For example, a booker can book a provider, a nurse, and a procedure room at the same time.
|
|
Use Appt Detail Screen When Booking Appointment |
Select to display Appointment Detail window automatically when booking an appointment. |
|
Double Click Patient Appointment |
Choose which window opens when you double-click a patient appointment in the scheduler: the Patient Maintenance window or the Appointment Detail window. |
|
Print on Patient Future Appointment Report |
Type a message to print on the Future Appointments Report for all patients, such as “Please arrive 15 minutes prior to your appointment”. The Future Appointments Report provides a patient a list of all their upcoming appointments (Patient Maintenance window > Reports > Future Appointments). |
|
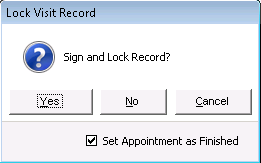
Allow Appointment to be set Finished from the Physician Workdesk |
You can enable providers to mark appointments as “Finished” when they exit a SOAP note,
To finish the appointment, the provider leaves the Set Appointment as Finished check box selected. This changes the appointment status to Finished. To enable this feature, in the Allow Appointment to be set Finished from the Physician Workdesk list, select one of the following options: None: Does not display the Set Appointment as Finished check box. Arrived: Selects the Set Appointment as Finished check box by default only if the patient's status is Arrived. In Exam Room ('Examined'): Selects the Set Appointment as Finished check box by default only if the patient's status is Examined. Any: The Set Appointment as Finished check box is always selected by default. |

| 3. | Click Save |
© 2018 ![]()