Setting provider booking hours
Define the hours in the day when the provider is available for appointments.
When setting a provider’s booking hours, consider the earliest possible time and the latest possible time that a provider may need to be booked for an appointment. A leeway of 30 to 60 minutes both before and after normal booking hours is a good starting point.
Don't forget to consider nights when providers may work with walk-ins.
Steps
| 1. | From the scheduler menu, choose Configure > Physician and Clinic Hours (Schedule Setup). The Time Definition Maintenance window opens. |
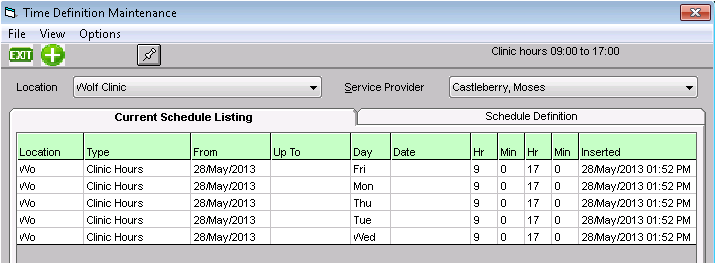
| 2. | If your clinic has multiple locations, in the Location list, click the location where you want to set the hours. |
| 3. | In the Service Provider list, choose the provider. |
If you want to set hours that apply to the entire clinic (such as statutory holidays), click <Entire Office> in the Service Provider list.
The Schedule Type list contains a list of holidays and other clinic-wide schedule types to choose from.
| 4. | Complete one of the following actions: |
To add clinic hours, click New ![]() .
.
To modify a provider's currently defined clinic hours, in the Current Schedule listing tab, double-click the Clinic Hours you want to modify.
The Schedule Definition tab opens.
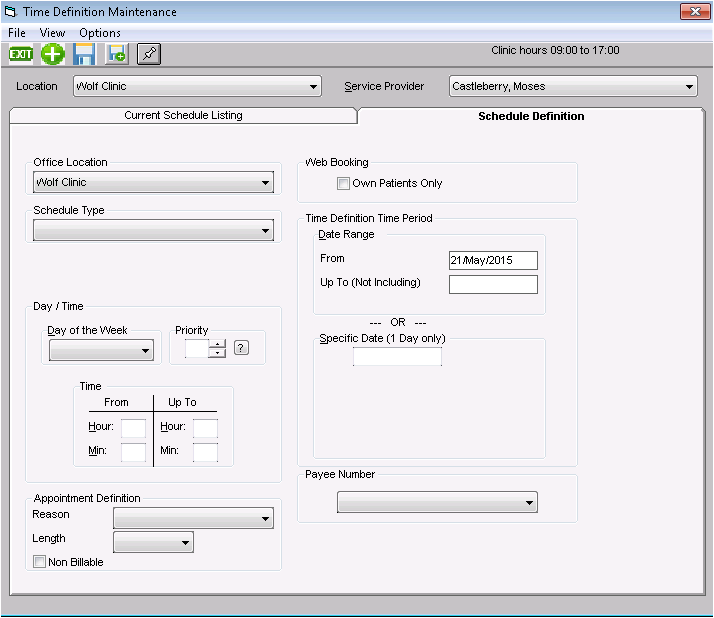
| 5. | Enter or modify information using the following table as a reference: |
| Field | Description |
|---|---|
|
Office Location |
If your clinic has multiple clinic locations, select the location you want to modify the provider's schedule for. |
|
Schedule Type |
Select Clinic Hours. Tip: If you are defining web-bookable day or time slot, click a type that is configured to be “web bookable”. If you do not see the schedule type that you want in the list, you can add a new type. See Adding schedule time types. |
|
Day of week |
Complete one of the following actions: To input clinic hours for each day of the week individually, click a day of the week. To input clinic hours for all days of the week at once, click <All>. |
|
Priority |
If you are creating time definitions for a provider's clinic hours, enter 9 as the priority. The priority determines what layer on the schedule that the time definition displays. The larger the priority number, the lower the layer on the appointment schedule. For more information, see Appointment priorities. |
|
Time |
Enter the start and end times the provider will be taking appointments for the day selected (or for the week, if <All> is selected). Enter times using a 24 hr clock. For example, if the provider takes appointments from 9am-4pm, enter 9 in the From Hour field and 00 in the From Min field. Enter 16 in the Up to Hour field and 00 in the Up to Min field. If a provider does not take patients for one to several hours in the middle of the defined clinic hours (for example, if they are off for lunch from 12pm-1pm), then you can create another Time Definition to block off those time slots with colour and text. See Blocking off regular lunch or other breaks. |
|
Reason |
Select a default appointment reason. (This field is usually set to Office Visit.) |
|
Length |
Select the default length for appointments booked in these time slots. |
|
Non Billable |
Select if you don't want appointments booked in these time slots to be billed. |
|
Web Booking |
|
|
Time Definition Time Period |
In the From and Up To (Not including) fields, enter the date range you want the hours you defined to be in effect The From field defaults to today’s date. If you leave the Up To field blank, the time period is forever, or until you change the Up To field at a later date. If this time definition is only relevant for one day, enter the date in the Specific Date (1 Day Only) field. |
| 6. | To delete a time definition, click it in the Current Schedule Listing tab and from the File menu, choose Delete Time Definition. |
| 7. | Click Save |
© 2018 ![]()