Adding schedule time types
Schedule Time Types are templates of background text (and, optionally, colour) you can add to appointment schedules.
Time types can also be configured so that appointments booked in those slots default to a specific appointment reason and appointment length. For example, if a provider takes complete physical appointments only on Tuesday and Thursday afternoons, you can add a CPX time type to the schedule for those appointment slots. All appointments booked on those slots will have a default appointment reason of CPX.
If office hours are defined for a provider (as opposed to out-of-office hours), examples of time types might be CPX (Complete Physical Exam) or Drug Representative. If out-of-office hours are defined, examples of time types might be vacation, conference, lunch, or rounds. Other clinic-wide time types include holidays. You can set the time type to appear on the Scheduler with a certain color in the background.
Once created, you can apply time types to appointment schedules using time definitions. See Assigning specific types of appointments to days or time slots.
Steps
| 1. | From the scheduler menu, choose Configure > Time Types. The Schedule Time Type Maintenance window opens. |
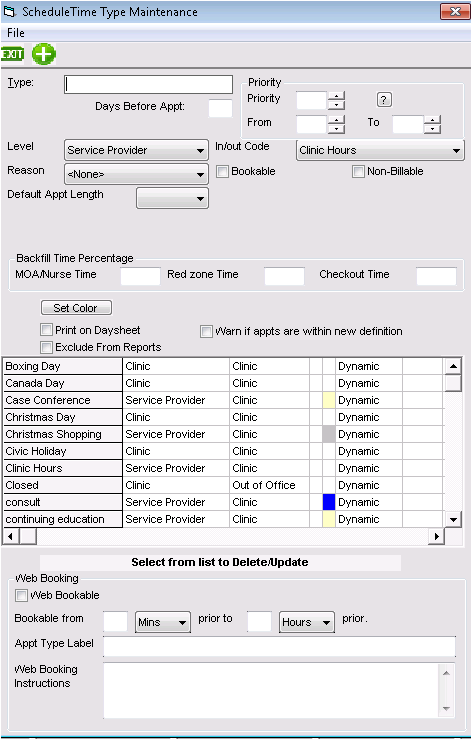
| 2. | In the top left area, click New |
| Field | Description |
|---|---|
|
Type |
Enter the word or phrase that you want to display on the scheduler. |
|
Days before Appt |
To display a warning if a staff member books an appointment on these time slots more than a certain number of days prior to the appointment, enter the number of days here. To display no warnings, leave this field blank. |
|
Level |
Perform one of the following actions: To make this time type available when defining each provider’s schedule, click Service Provider. To make this time type available only when defining clinic schedules (for example, holidays or office closed), click Clinic. |
|
Reason |
Select the default appointment reason to display on appointments booked in these time slots. Examples of appointment reasons are None, Office Visit, CPX, Office Visit - Online, and CPX- Online. Note: The Reason list contains the list of appointment reasons that were defined in the Appointment Reason Maintenance window. To add or edit an appointment reason, on the Scheduler menu, click Configure > Appointment Reasons. See Configuring appointment reasons. |
|
Bookable |
Select to enable appointments to be booked on these time slots. |
|
Non-Billable |
Select if you do not want to bill for appointments booked on these time slots; these appointments are not added to billing. Clear to ensure that appointments booked on these time slots are billed. |
|
Default Appt Length |
Select the default length for appointments booked on these time slots. Note: This appointment length should match the provider’s time slot intervals. For example, if a provider’s schedule is set to 10 minutes intervals, then the Time Type Default Appt Length should be set to 10 minutes. |
|
Set Color |
Click to choose a background color on these time slots. |
|
Print on Daysheet |
Select to print the schedule time type on your daysheets Note: Most clinics leave this check box clear as they want only appointments displaying on their daysheets. |
|
Exclude From Reports |
Leave this check box cleared. |
|
Warn if appts are within new definition |
Select if you want users to receive warnings when they try to book an appointment on the time slot. |
|
Priority |
Enter the default priority level for the time type. Note: The priority determines on what layer on the schedule the time definition displays. The larger the priority number, the lower the layer on the appointment schedule. 9 = lowest layer (displays behind all other layers) 1 = highest layer (displays in front of all other layers) Click the question mark icon |
|
From To |
Define the range of priority levels you can apply to the time type. For example, if you want the default priority level to be 7, but you want to be able to customize it between 5 and 9 you would set the Priority field as 7, the From field as 5, and the To field as 9. |
|
Web Booking area |
| 3. | To view from the Options menu, choose Show History (Ctrl+H). |
| 4. | Click Save |
© 2018 ![]()