Creating “web-bookable” schedule time types
You should create a specific schedule time type for the purpose of defining web-bookable time slots. Name this schedule time type “Web Appt”, “Online Appt”, or something similar.
Clinics with multiple providers on different time intervals
If you have multiple doctors on different schedule intervals, create a separate schedule time type for each interval.
For example, in a multi-doctor clinic, Doctor A has 10-minute appointment slots and Doctor B has 15-minute appointment slots. The clinic creates two schedule time types to define “Web Bookable” appointments for each provider:
Web Appt 10– To define “Web Bookable” appointments for Doctor A.
Web Appt 15 – To define “Web Bookable” appointments for Doctor B.
Providers who have multiple types of appointments at different time intervals
If one of your providers books several types of appointments that require different lengths of time, create a separate schedule time type for each length.
For example, a doctor requires 10-minute appointments for most of their general clinic visits,however they require 20-minute appointments for complete physicals. You could then create the following time types to accommodate each appointment length:
Web Appt 10– To define “Web Bookable” appointments for general clinic visits.
Web Appt 20– To define “Web Bookable” appointments for complete physicals.
Steps
| 1. | From the Appointment Scheduler menu, click Configure > Time Types. The Schedule Time Type Maintenance window opens. |
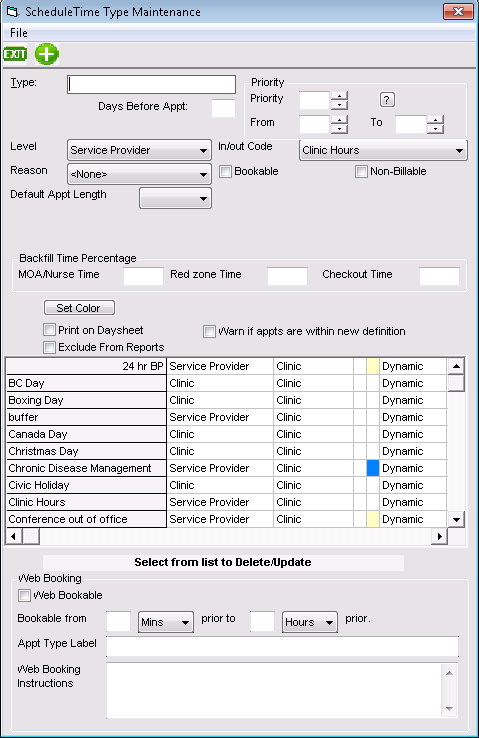
| 2. | Click New |
| 3. | Enter information for the new Time Type, using the following table as a reference: |
| Field | Description |
|---|---|
|
Type |
Type the word or phrase you want to appear on the schedule. For example, for 10-minute “web bookable” slots, type Web Appt 10. |
|
Level |
In the list, complete one of the following actions: To make this time type available when defining each provider’s schedule, choose Service Provider. To make this time type available only when defining clinic schedules (for example, holidays or office closed), choose Clinic. |
|
Reason |
In the list, choose the default appointment reason to display on appointments booked in these time slots. For example, you can have the appointment reason default to Office Visit – Online. Note: This list contains appointment reasons that are defined in the Appointment Reason Maintenance window. You can add or edit appointment reasons as needed. See Enabling specific types of appointments to be booked online. |
|
Bookable |
Select this check box (if it is not selected already). |
|
Non-Billable |
To ensure that appointments booked on these time slots are billed, leave this check box clear. |
|
Default Appt Length |
In the list, click the default length for appointments booked on these time slots. Note: The appointment length should be compatible with the provider’s time slot intervals. For example, if a provider’s schedule is set to 10-minute intervals, then the set the interval to 10-minute or a multiple of 10-minute (for example, 20 minutes). |
|
Set Color |
To display a background color on these time slots, click Set Color and choose the color you want. |
|
Print on Daysheet |
Select to print the schedule time type on your daysheets. Note: Most clinics clear this option, as they want only appointments to display on their daysheets. |
|
Exclude From Reports |
Leave this check box clear, unless you want appointments booked on these time slots to be excluded from trend reports. |
|
Warn if appts are within new definition |
Clear this check box (if it is not clear already). |
|
Priority area |
|
|
Priority |
Enter the default priority level (usually 6 or 7) for the time type. The priority determines what layer on the schedule that a time definition displays. The larger the priority number, the lower the layer on the appointment schedule. 9 = lowest layer (displays behind all other layers) 1 = highest layer (displays in front of all other layers) Click the |
|
From To |
Enter the range of priority levels you can apply to the time type. For example, if you want the default priority level to be 7, but you want to be able to customize it between 5 and 9, type 7 in the Priority field, type 5 in the From field, and type 9 in the To field. |
|
Web Booking area (located at the bottom of the window) |
|
|
Web Bookable |
Select to enable patients to book their own appointments online on these appointment slots. Note: You must select this check box to enable appointments to be bookable from the patient portal. |
|
Bookable from |
Enter the minimum number of minutes, hours, or days ahead of time patients can book online appointments on these appointment slots. |
|
Prior to |
Enter the maximum number of minutes, hours, or days ahead of time a patient can book an online appointment for. |
|
Appt Type Label |
Enter a label for the appointment type. The label typically matches the name entered in the Type field. |
|
Web booking instructions |
Enter any booking instructions for the patient. |
| 4. | To save the time type, click Save |
| 5. | When you are done, click Close |
© 2018 ![]()