Creating security groups
View video tutorial: Managing security groups and locations
Security in Wolf EMR and access to patient information and functionality is managed with group-based security. You create groups, assign permissions to the group, and then assign users to the group. Users can belong to multiple groups.
Examples of security groups
Groups of employees who often receive the same messages and tasks. For example, if several employees manage referrals for all providers, those employees could belong to a “Referrals” security group.
Groups of employees who share similar duties and are restricted from performing certain actions in the EMR. For example, if a large scale clinic has a group of employees who only book appointments, they may as a group be restricted from accessing medical records.
Groups of employees or clinical staff who share a similar role, such as nurses and billing clerks.
Teams of providers who together manage a specific group of patients.
Combined teams of providers and staff who work together as a clinical group within a large scale clinic.
All members of a specific clinic location (if your clinic has multiple clinic locations).
Only users with the administrator authority can create security groups. Before you can create groups, you must enable Advanced Security (see Setting security preferences).
Once a security group is created, you define the security rules for the group, which restrict or enable which patient records and which Wolf EMR features the group can access (see Creating security rules).
Steps
| 1. | From the Wolf EMR Home tab, click Configuration |
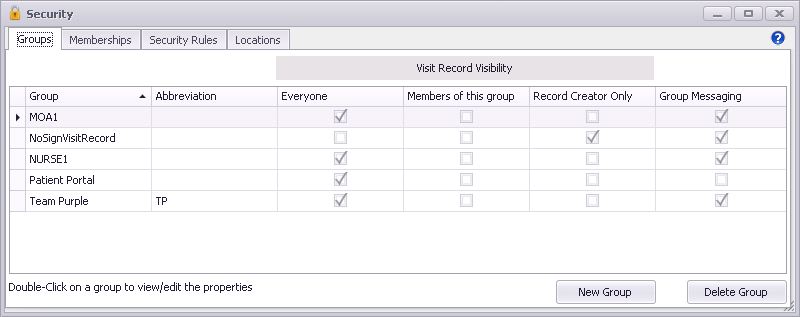
| 2. | From the Configuration menu, choose View > Security > Groups. The Security window opens with the Groups tab selected by default. |
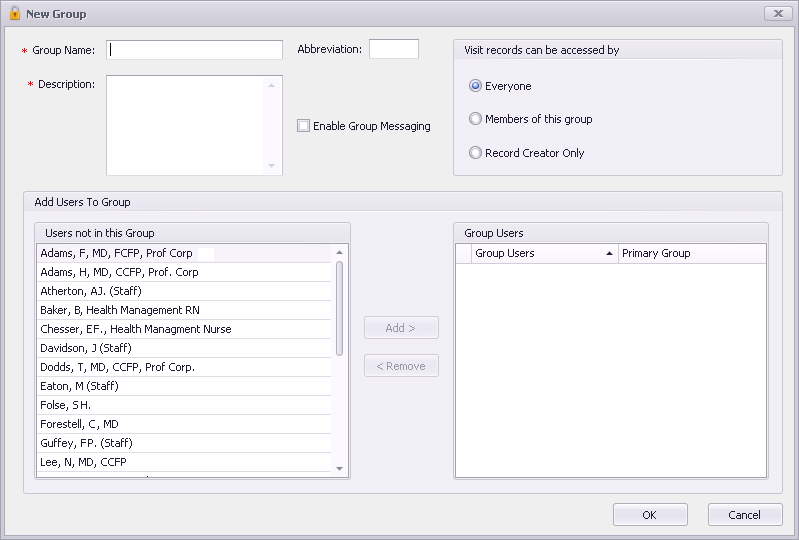
| 3. | To add a group, click New Group. The New Group window opens. Use the following table to create the group. |
| Field | Description |
|---|---|
|
Group name |
Type a name for the security group, such as MOA or Billing. |
|
Description |
Type a short description. |
|
Abbreviation |
(Optional) Type an abbreviation for the security group. When specified, the abbreviation is displayed as the Role in the following areas of the EMR: Encounters list within the current history tab of the medical summary and the patient tab in the WorkDesk. Practice search rule matches Flowsheet window You can disable showing this role from the WorkDesk user preferences > Miscellaneous tab. |
|
Enable Group Messaging |
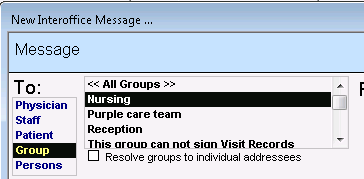
Select to enable sending messages and tasks to this group. When enabled, the group name appears when you choose to address a message to a group.
|
|
Visit records can be accessed by |
Choose one of the following options: Everyone: To allow all clinic users to view visit notes created by members of this security group. Members of this group: To restrict users who are not members of this security group from viewing visit notes created by members of this security group. Record Creator Only: To allow only the security group member who created a visit note to view their own visit notes. |
|
Add Users To Group |
From the Users not in this Group list on the left, select a name and click Add >. The EMR displays the selected user in the Group Users list on the right. If the user belongs to multiple security groups and you want to make this their primary group, select the Primary Group check box. Security settings for a user’s primary group take precedence over security settings for other groups they belong to. If a group has visit record restrictions, only users who have that group set as their Primary Group can see visit records created by other members of that group. |
| 4. | To edit a group, double-click the one you want to edit. |
| 5. | To delete a group, select it and click Delete Group. Before you can delete a group, you must first remote all of its users. You cannot delete the group if there are group messages or follow-ups that are not completed. |
| 6. | When you are done, click Close |
© 2018 ![]()