Creating bills from the billing list
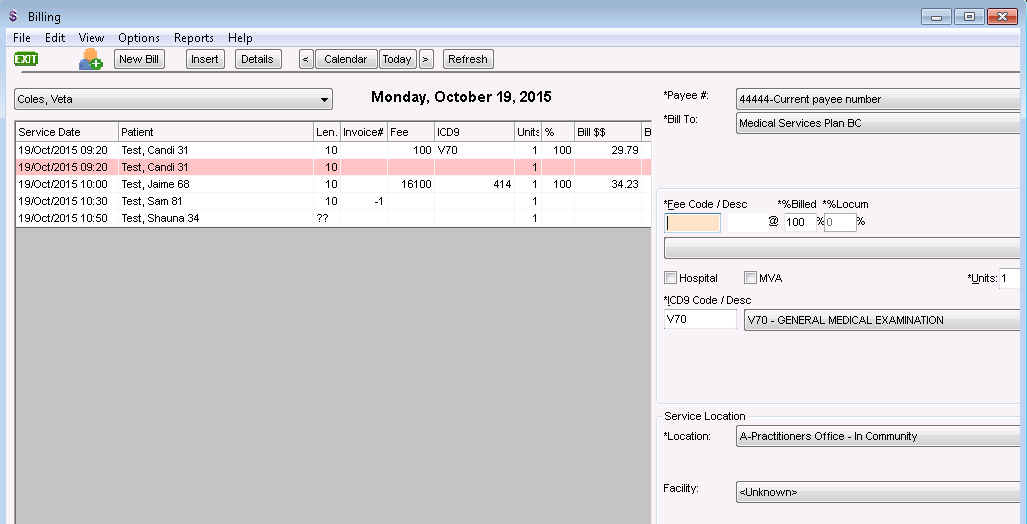
The EMR creates a billing list for each provider based on booked appointments. The billing list is visible when you open the Billing module. From the billing list, you can create and save bills.
Steps
| 1. | From the Wolf EMR home page, click Billing |
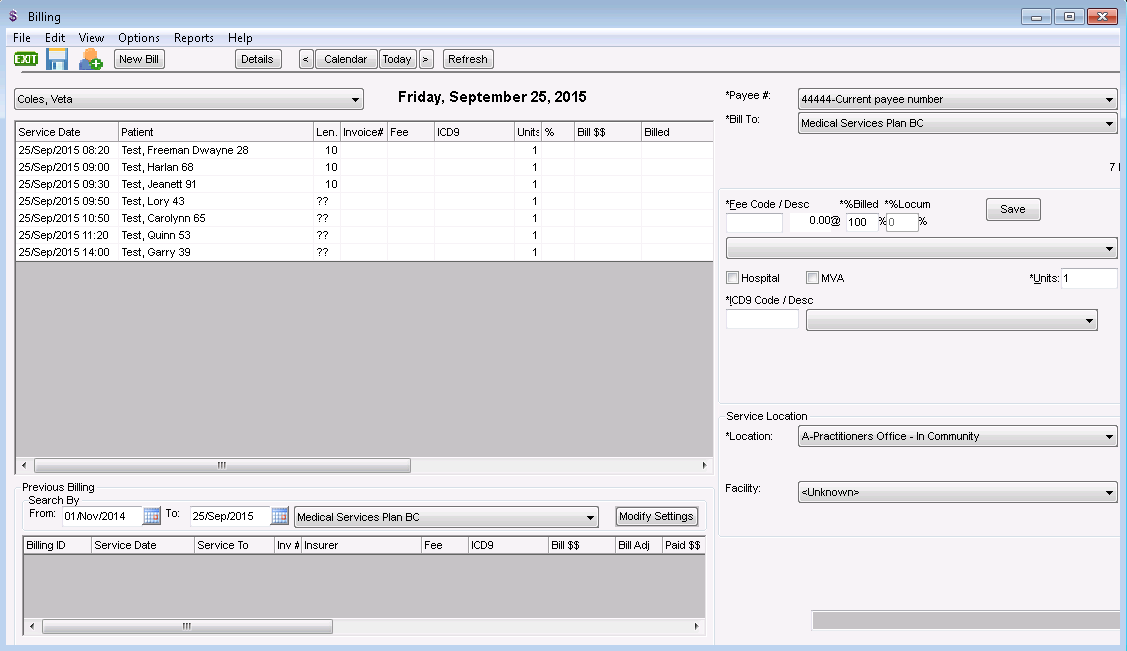
| 2. | In the provider list, click a provider. The provider’s billing list for today is displayed. |
Note: If you are the patient’s provider, your name is selected by default.
| 3. | If you are creating a bill for a day other than today, click Calendar, and choose the service date. The provider’s billing list is displayed for the selected date. |
| 4. | In the billing list, click a patient. If the patient has not been marked as arrived, you are prompted to do so. To mark the patient as arrived, click Yes. |
Note: You cannot bill a patient until they have been marked as arrived.
Arrived status
Question marks (??) in the Len. (Length of appointment) column means the patient was not marked as arrived.
You can click ?? to set the patient status as arrived. The EMR displays the following prompt: “Patient not updated as arrived, cannot bill. Set 'arrived' status?” Click Yes.
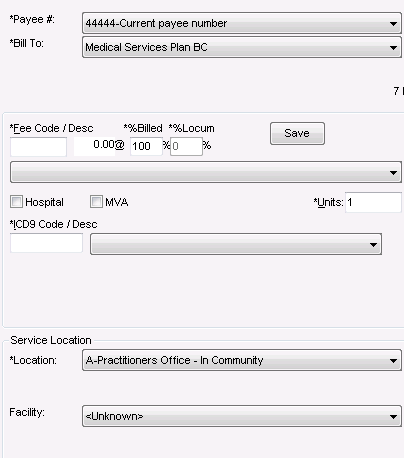
The entry area for the selected bill opens in the right pane, with:
The Bill To field defaulted to Medical Services Plan BC.
Other bill details (for example, fee code(s) and diagnostic codes) pre-populated. What information populates depends on your billing screen behaviour settings (see Configuring bills to populate information from previous bills and Setting default values for bills), and on what information the provider entered in the patient’s visit SOAP note (see Billing from SOAP notes (providers only)).
| 5. | Using the following table, enter information for the bill. |
| Field | Description | |||||||||||||||
|---|---|---|---|---|---|---|---|---|---|---|---|---|---|---|---|---|
|
Bill To |
In the list, if you are billing MSP, or if you are billing ICBC via MSP, leave Medical Services Plan BC selected. If a CL-19 ICBC form was completed for an ICBC visit, bill the visit as you do for other third-parties. See Creating bills for patients and third parties. |
|||||||||||||||
|
*Payee # |
The provider’s MSP billing number is populated by default. If the provider has more than one billing number (for example, the provider works out of two locations), in the list, select the billing number you want to bill under. |
|||||||||||||||
|
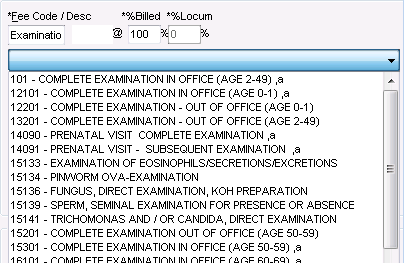
* Fee Code/ Desc (required field) |
Enter the fee code or a fee description and then, in the list below, select a fee code.
Tips for entering fee codes: The EMR does not recognize fees that start with ‘0’. Instead, enter the number that follows the ‘0’. For example, instead of entering 0100, enter 100. If you enter a fee code that differs depending on the patient’s age, you can enter the fee code for any age group, and the EMR automatically corrects the code for the patient’s age. For example, if you enter 100 (visit in office: age 2-49 years) for a 60 year old, the EMR changes the code to 16100 (visit in office: age 60-69 years). For detailed information on what fee codes you should charge for certain services, and rules behind them, see the You can have a fee code populate this field automatically. See the below note on setting default fee codes. If your clinic has a default fee code list set up, you can select a “favourite” fee code from the list without entering a fee code or description first. |
|||||||||||||||
|
Setting default fee codes The default fee code for a bill is determined by entries and selections made in the following locations. The top-most selection takes precedence over the items below it. Visit Record: Uses the fee code entered in the billing area of the visit SOAP note. See Billing from SOAP notes (providers only). Appointment Reason Default Fee Code: Uses the fee code entered as the Default Fee Code in Appointment Reason Maintenance. You can select the Appointment Reason when creating an appointment. Find Previous Bill Setting: Uses the fee code from the previous bill for the selected patient. You can select this option from the Billing Screen Behaviour window. See Configuring bills to populate information from previous bills. Fee Code Maintenance Default List: Populates the fee code list with selected (favourite) options. Uses the fee codes from Fee Code Maintenance Data tab that have the Include in default list check box selected. Up to 50 fee codes can be displayed in the list. The first fee code in the list is the default unless another fee code is selected from the list at the time of creating the bill. Tip: Your favourite fee codes cannot be sorted, enter your most used fee codes first to ensure that they display at the top of the list. |
||||||||||||||||
|
%Billed |
Defaults to 100%. To charge for only a percentage of the normal service fee, enter the percent to be paid. For example, if you are billing a Pap smear and a tray fee with an office visit, enter 50% for the office visit fee code (as per MSP guidelines). |
|||||||||||||||
|
%Locum |
If the service was provided by a locum, enter the percentage that is to be paid to the locum. |
|||||||||||||||
|
Hospital |
If this bill is related to a hospital stay, select this check box. If you select a Service Location that corresponds to a hospital, the Hospital check box is selected by default. |
|||||||||||||||
|
MVA |
If this bill is related to a motor vehicle accident:
Note: Enter only numbers. The bill will be rejected if you include letters. If you do not know the ICBC Claim number, and leave this field blank, MSP will forward the claim to the adjudicator for payment.
In the billing list, the bill displays YES in the MVA column. |
|||||||||||||||
|
Units |
To bill for more than one unit (for example, if you administer multiple injections), enter the number of units. Depending on the insurer and service being billed, units can represent whatever you need to multiply the fee by (for example, days, or number of services). |
|||||||||||||||
|
*ICD9 Code / Desc |
You can enter up to 3 ICD9 codes for a bill. To enter an ICD9 code, in the *ICD9 Code / Desc field, perform one of the following actions: If you know the ICD9 code, enter the number. Ensure you enter the ICD9 code without a decimal point. For example, enter 2501 instead of 250.1. If you do not know the numeric ICD9 code, enter a description and then, in the list, click an ICD9 code. ICD9 code(s) pre-populate in this field if: A diagnosis was assigned to the visit (in the ASSESSMENT area of the visit SOAP note or Consult Letter Examination) You selected the Find Previous ICD9s Billing Screen Behavior. If this screen behaviour is enabled, the ICD9 code(s) used in the patient’s previous bill populates. Also, if you click the ICD9 list, all ICD9 codes used in the patient’s previous bills are listed. See Configuring bills to populate information from previous bills. Tip: If you are unsure of what ICD9 code to bill, and want to see a list of the patient’s current problems, press F7. The EMR displays the patient’s Medical Summary. Although you can enter up to 3 ICD9 codes for a bill, depending on the insurer you are billing, there may be only one, two, or no ICD9 code fields available. If you have administrator authority in Wolf EMR, in Insurer Maintenance, you can set how many ICD9 code fields display on bills to specific insurers. See Managing third-parties (insurers) you bill to. |
|||||||||||||||
|
Location |
If the provider provides services out of more than one location, click the location where the service was provided. |
|||||||||||||||
| 6. | To add more detailed information to the bill (for example, |
| a) | At the top of the billing window, click Details. The |
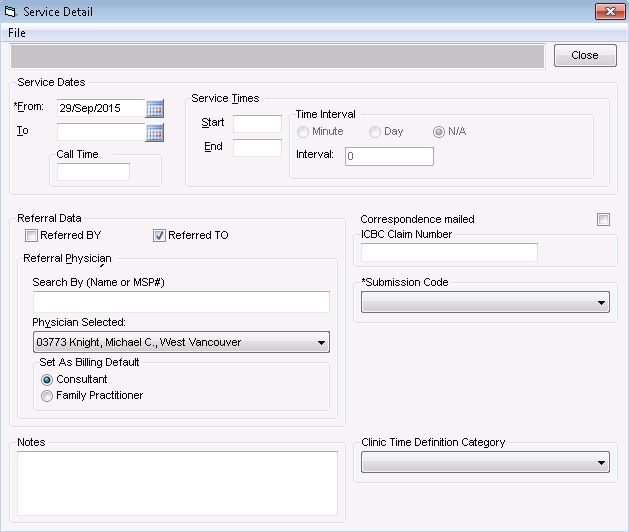
| b) | Using the following table, |
| Field | Description | ||||||||||||
|---|---|---|---|---|---|---|---|---|---|---|---|---|---|
|
Service Dates |
If the service took place over multiple days, in the * From and To fields, enter the service start and end dates, or to select a date from a calendar, click |
||||||||||||
|
Service Times |
If the fee code requires details on how long the service took to complete:
Enter call, start, and end times without a colon (:), and using a 24 hour clock. For example, if a service started at 2:00pm, enter 1400. |
||||||||||||
|
Referral Data |
If the fee code requires a referring provider:
If the patient has a referring provider or consultant entered in Patient Maintenance, and that provider is set as the Billing Default, the provider’s name populates the Physician Selected field automatically. If the fee code requires the consultant you are referring the patient to (for example, for a no charge referral - 3333):
When you create a referral for a patient, the EMR displays a dialog box with the following prompt: “Send Referral to MSP?”. To create a no-charge referral bill for the patient, click Yes. |
||||||||||||
|
Notes |
Enter any additional billing notes for MSP. For example, if you are billing for a delivery, you can enter information about the delivery. If you add additional notes to the bill, MSP manually reviews the bill. |
||||||||||||
|
Correspondence mailed |
Select if you are sending additional documents in relation to the claim (for example, an operative report), . |
||||||||||||
|
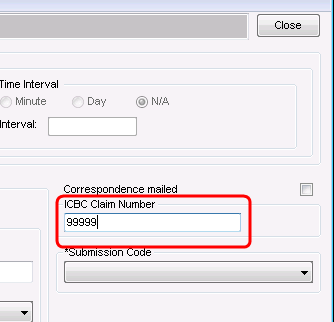
ICBC Claim Number |
If the service is related to a motor vehicle accident, and you know the ICBC Claim Number, enter the claim number here. If you do not know the ICBC Claim number, MSP will forward the claim to the adjudicator for payment. |
||||||||||||
|
Submission Code |
If the Submission Code is any code other than O Normal Submission, in the list, select the code you want. |
| a) | When you finish adding your detailed billing information, click Close |
| 3. | Perform one of the following actions: |
To include only the one fee code for this bill, click Save.
To add other fee codes to this bill:
| a) | Click Save+New. The EMR inserts another billing list entry for the patient. |
| b) | Enter the Fee Code and other billing information as required. See step 5 and step 6. |
| c) | Repeat the two steps above for each additional fee code. |
| d) | When you finish adding fee codes, click Save. |
© 2018 ![]()