Linking documents to patient charts
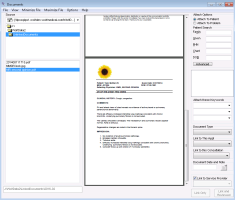
You can link or attach electronic faxes and scanned documents to a patient’s chart. When you link a document to a patient chart, that document becomes available under the Documents tab in the patient's medical summary.
When you link a document, we recommend assigning keywords and document types to facilitate finding documents later. For more information, see Keywords and document types when linking documents.
You can also link documents to a specific problem or medication as a resource or handout (see Linking documents to problems as resources or handouts).
Steps
| 1. | From the Wolf EMR Home tab, click Documents |
| 2. | On the left side of the window, click a document. A preview of the document opens. |
To refresh the view, choose Options > Refresh or press F5 on your keyboard.
If you cannot see new documents, see Unable to receive new documents/scans/faxes?.
To change the folder from which to import documents, choose a new drive or folder under Source in the top left corner.
Editing documents from the Documents window
If you do not have an external PDF editing application, and a document is up-side-down, in the Document’s window, you can rotate the document before you link it to a patient’s chart:
In the left pane, select the document you want to edit and then above the document preview, click Document > Rotate Pages.
From the Documents window, you cannot use any other document editing options unless you have purchased the PDF editing software from TELUS Health.
| 3. | In the right pane, in the Attach Options area, select Attach to Patient. |
| 4. | In the Patient Search area, enter the patient's name, PHN, chart #, or date of birth and press Enter on your keyboard. |
| 5. | In the search results, click the patient’s name. |
Tip: If there are too many patient names in the results, or if you want to associate the document with an inactive patient, click Advanced to perform an advanced search, which has more options.
| 6. | In the Attach these Keywords list, select up to three keyword to describe the document, such as ECG. You can also type a keyword in the field. For more information, see Keywords and document types when linking documents. |
| 7. | In the Document Type list, select the document type or start to type a name to automatically filter the list. The document type helps you identify and filter documents in the patient’s chart. You cannot free-type a value into this field. For more information, see Keywords and document types when linking documents. |
Tip: Photos uploaded from the TELUS EMR Mobile app have a document type of Mobile Upload.
Tip: When linking several documents in a row that will have the same keywords and/or document types, you can choose to retain the ones that you just selected as the default ones for the next document. They keywords and document types are retained only for your current session, and return to blank after you close the Documents window. From the Options menu, choose Retain Keyword(s) and/or Retain Document Types.
| 8. | To link the document to one of the patient's upcoming visits, in the Link to This Appt list, select the visit. Linking a document to a consultation changes the status of the referral from pending to completed. |
| 9. | If the document is related to a referral (such as a consult letter or appointment confirmation), in the Link to this Consultation list, select the referral. |
Note: If you link a document to a referral, the referral status changes from Pending to Completed, and reconciles the referral.
| 10. | In the Document Date and Note area, enter the date the document was created. Use the format ddmmyy or dd/mmm/yyyy. |
| 11. | To add notes about the document, click the Note icon |
| 12. | The Link to Service Provider check box is selected by default. When selected, the EMR links the document to the patent's primary service provider. If the patient does not have a primary provider, or you want to link the document to another provider, clear the check box or choose another provider. |
| 13. | In the bottom right corner of the window, perform one of the following actions: |
Click Link Only to add the document to the patient’s chart and notify the provider to review the document.
Click Link and Reviewed to add the document to the patient’s chart without notifying the provider (typically used for scans that the provider has already viewed).
© 2018 
