Creating patient lists
If the video does not play, to copy the web address and then paste it into a web browser outside the Wolf EMR data centre.
If the video does not play, to copy the web address and then paste it into a web browser outside the Wolf EMR data centre.
You can create as many patients lists as you want to accommodate specific care teams or specialized services. By default, a general waiting list is already available. You cannot edit or remove this list.
If your clinic is a specialist clinic, you can also create waiting lists for each priority level. For example, you can have a P2 waiting list to track your Priority 2 patients.
Restricting users from modifying your clinic's lists
By default, any user can add or modify patient lists. Using security rules, users with administrator authority can restrict specific users from accessing the Patient List Management window. See Creating security rules.
Restricting user access to patient lists
If the video does not play, to copy the web address and then paste it into a web browser outside the Wolf EMR data centre.
Steps
| 1. | Do one of the following: |
From the Wolf EMR Maintenance tab, click Manage Lists ![]() .
.
From the scheduler menu, choose Patients > Patient Lists, and then, on the Patients on List window, click Manage Lists ![]() .
.
The Patient List Management window opens.
| 2. | Perform one of the following actions: |
To create a patient list, click New List ![]() .
.
To modify a patient list, click the patient list.
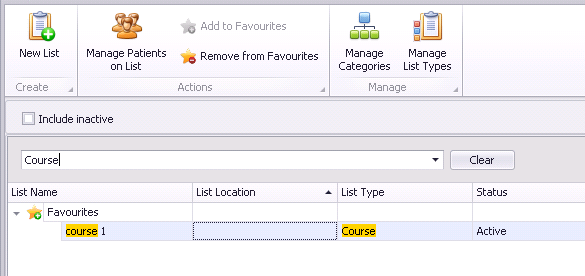
If your clinic has numerous patient lists and you cannot find the list you want, in the Search field, enter part or all of the list name, location, or list type. The EMR filters the list to display only patient lists that contain your search criteria.
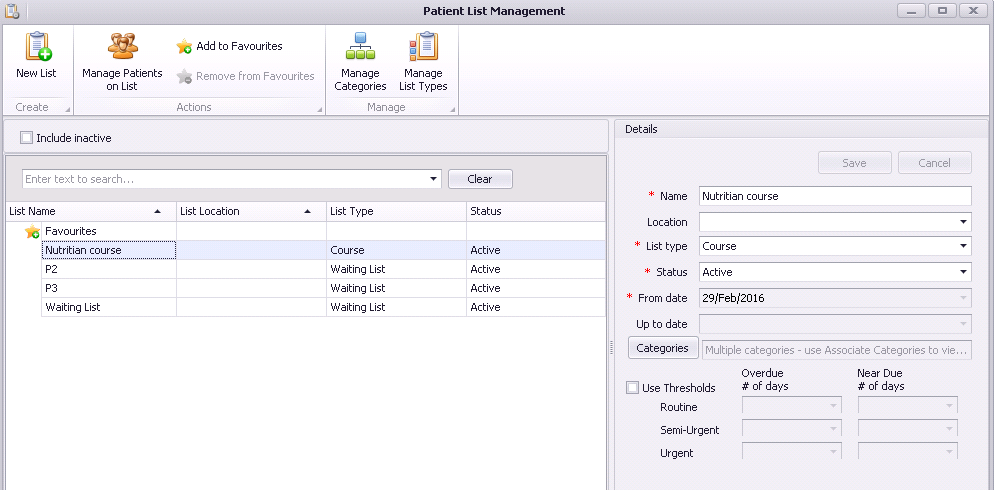
| 3. | In the Details area, enter information using the following table as a reference. |
| Field | Description |
|---|---|
|
Name |
Type a descriptive name for the patient list. |
|
Location |
If you have multiple clinic locations, select the location for the list. Leave blank to enable the list for all locations. This field is visible only if you have multiple clinic locations set up in Wolf EMR. Only users assigned to a specific location can view patient lists for that location. |
|
List Type |
Select the type of list. If the option you want is not available, you can add it (see Configuring patient list types). |
|
Status |
If you are creating a list, the Status is set to Active automatically. |
|
Category |
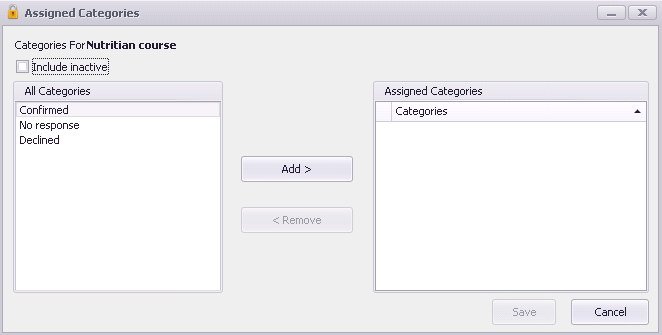
You can enable specific category options for the patient list. For example, you can enable users to assign patients on a course list the category of Confirmed, or Declined. Before you can enable categories for a list, the categories must first be added (see Configuring patient list categories). To enable categories for the list: 1. Click Category. The Assigned Categories window opens.
2. In the All Categories list, click a category you want to enable, and then click Add >. The EMR adds the category to the Assigned Categories list. Note: If you want to enable a category that has been deactivated, select the Include inactive check box. The EMR includes all deactivated categories in the All Categories list. 3. Repeat step 1 and step 2 for each category you want to enable. 4. When you are finished adding categories, click Save. |
|
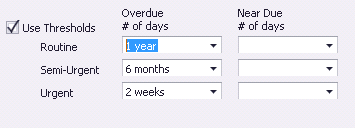
Use Thresholds |
If you want to view if listed patients are over due and/or near due for an appointment booking: 1. Select the Use Thresholds check box. 2. Beside Routine, Semi-Urgent, and Urgent, in the Overdue # of days list, select the amount of time that constitutes overdue.
3. Optionally, beside Routine, Semi-Urgent, and Urgent, in the Near due # of days list, select the amount of time that constitutes near overdue, or enter a number (in days). |
Note: If you are modifying a list and the Name, Location, and Status fields are unavailable for editing, this indicates that there are currently patients on the list. You cannot modify a list if there are patients on the list, including "inactive patients" (patients removed “with history”).
| 4. | Click Save. |
© 2018 ![]()