Setting default printers for terminals with SMART card readers
To set default printers for terminals with SMART card readers, you must configure each terminal individually. Before you set a default printer for a terminal, if you were working on another terminal previously, you must close all documents and patient records and then log out of your EMR session on the previous terminal first. You then start a new EMR session on the terminal you are configuring SMART printing for.
Note: Only users with administrator authority in Wolf EMR can set up SMART printing.
Steps
| 1. | If you just used another terminal, ensure you completely log out of your session from that terminal: |
| a) | Close any open documents or patient records. |
| b) | Close Wolf EMR using one of the following procedures: |
If you have the Wolf EMR home tab open, click ![]() and then choose Close all Wolf EMR Applications.
and then choose Close all Wolf EMR Applications.
If you have another Wolf EMR window open, on the task bar at the bottom of the desktop, right-click ![]() and then choose Close Window.
and then choose Close Window.
| c) | Log off your remote desktop session: On your remote desktop’s task bar, click Start |
Do not log off by clicking X at the top of the session window, or the session will not be ended.
| d) | Remove your SMART card. |
If you were on another terminal previously, and you do not log out of your session first, the SMART printing settings from the previous session can carry over to this terminal.
| 2. | Insert your SMART card into the card reader of the terminal you want to configure SMART printing for, and then type your data centre username and password. |
| 3. | If you are prompted to choose if this device is located outside the clinic, choose No. |
| 4. | Wait at least 1 minute before you proceed to the next step. |
| 5. | From the Wolf EMR Maintenance tab, click Configure SMART Printing |
Note: Don’t see the Configure SMART Printing![]() icon? This means that you are not set up with administrator authority in Wolf EMR.
icon? This means that you are not set up with administrator authority in Wolf EMR.

| 6. | In the Default Printers area, under Location, select the printer that print jobs should go to in the event that the default printer fails (for example, the master printer at the front desk). |
| 7. | Click Where am I? |
| 8. | Click OK. |
| 9. | When you are prompted to define a default printer, choose Yes. The Terminal window opens. |
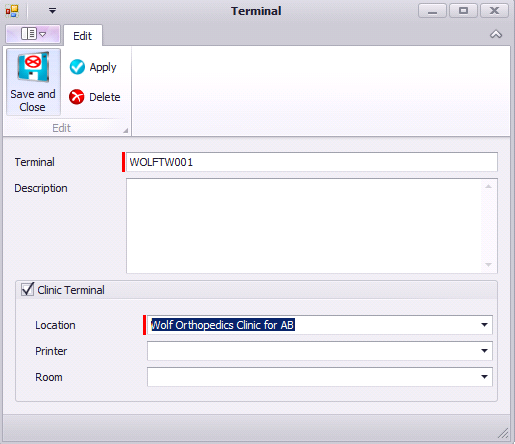
| 10. | Using the following table, set or modify the default printer for this terminal. |
| Field | Description |
|---|---|
|
Terminal |
This terminal’s identification populates automatically. Ensure this matches the terminal you are currently on. |
|
Description |
Enter a description to identify this terminal. For example, “Dr. Smith’s computer”. |
|
Clinic Terminal |
Select this check box to indicate that this terminal is located within the clinic. |
|
Location |
If your clinic has multiple clinic locations, select the location you are setting SMART printing for. |
|
Printer |
In the drop-down list, select the printer you want as this terminal’s default printer. |
|
Room |
If this terminal is located within a room, you can optionally enter the room name or number. |
| 11. | Click Save and Close |
| 12. | If you are moving to another terminal to set up SMART printing, log out of your session. See step 1. |
| 13. | Repeat step 2 to step 12 for: |
All other terminals you want to configure SMART printing for.
All access methods you use to access Wolf EMR. For example, if you click a red icon to access Wolf EMR with your SMART card, and click a blue icon to access Wolf EMR without a SMART card, you must configure SMART printing for each access method individually. After you configure SMART printing for one access method, you must log off of your session, and then log in again using the next access method.
All locations you want to configure SMART printing for. For example, if your clinic has multiple clinic locations, and this terminal is used for more than one location, you must configure SMART printing for each location individually.
| 14. | Test that SMART printing configuration was successful. See Testing that SMART printing is properly configured. |
© 2018 ![]()