Creating SMART form signatures
You can automatically add your signature to a SMART form that uses a signature bookmark, so that you do not have to manually sign certain forms.
When you use a SMART form that has a signature bookmark, you are prompted whether you want to add the signature. If you add the signature, the (electronically) signed document is saved as a PDF file (instead of a Word document) and is listed on the Documents tab of the patient's medical summary and in the Investigation/Document In Basket (when the Documents radio button is selected).
To create an electronic signature (or e-signature), the provider must sign a template and you mus then scan he signature and save it as an image. You must crop the image and then import it into Wolf EMR.
After the signature is created and imported into Wolf EMR, you can then add it to a SMART form using one of the signature bookmarks. See Adding electronic signatures to SMART forms.
Steps
|
a)
|
Perform these steps on your clinic's computer, and not from within the Wolf EMR remote desktop session. |
|
c)
|
Print the signature template: From the Word File menu, choose Print, and then click the print button. |
|
d)
|
Have the service provider sign within the signature box on the template. |
Tip: For best results, use a black pen and ensure that the signature is crisp.
|
e)
|
Scan the signed signature template and save it as a graphic file (preferably .png or .jpg). |
|
f)
|
Saved the scanned file on your clinic’s computer desktop. |
|
g)
|
From the computer's desktop, right-click the file and choose Copy (or press Ctrl+C). |
|
2.
|
Copy the signature image to the Wolf EMR data centre: |
|
a)
|
Go into your Wolf EMR data centre remote session. |
|
b)
|
On the desktop of the Wolf EMR remote session, right-click and select Paste (or press Ctrl+P). |
|
3.
|
Crop the signature image: |
|
a)
|
From the Wolf EMR data centre remote session, click the Start menu and choose Paint. If there is no such item, choose All Programs > Accessories > Paint. |
|
b)
|
Within the Paint program, click the button and choose Open (or press Ctrl+O). |
|
c)
|
Choose the signature file that you saved on your desktop. The signature template image opens. |
|
d)
|
Click the Select button. |
Tip: To make it easier to select the signature, you can zoom in or enlarge the signature image. From the View tab, click the Zoom In button. To go back to the regular view, click Zoom Out.
|
e)
|
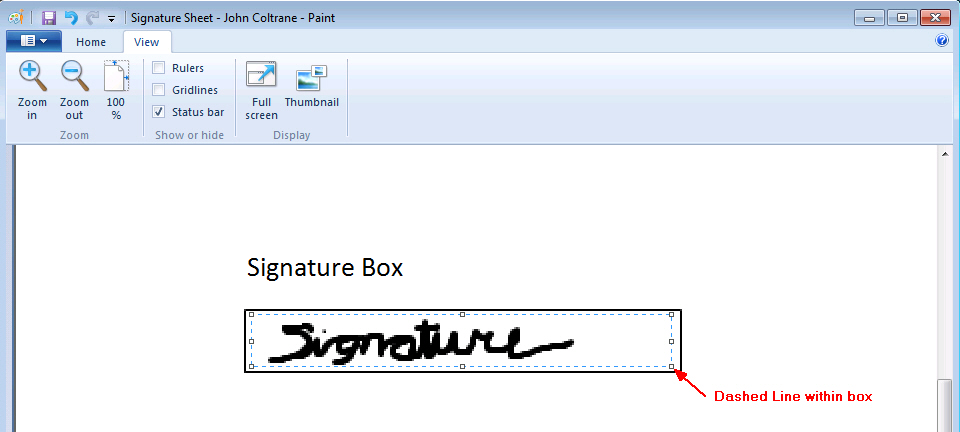
Put the middle of the + cursor just inside a corner of the box. |
|
f)
|
Click and, without letting go of the mouse button, drag your mouse until the selection highlights just within the outline of the box. |
|
h)
|
You will notice a dashed line around your signature. |
Ensure that the dashed selection is within the signature box and does not include the outline of the box so that the lines do not appear as part of your signature image.
If you make a mistake and want to re-select the signature, press Ctrl+Z on your keyboard to clear the selection.
|
i)
|
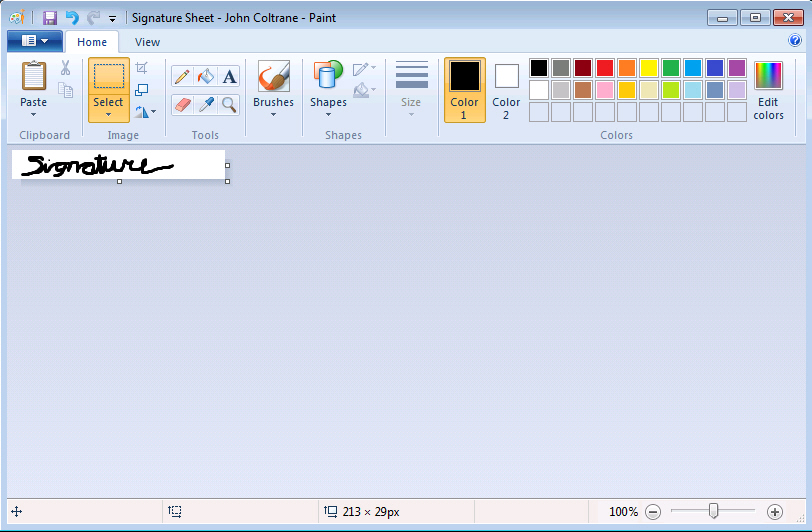
When you are happy with your selection, on the Home tab double-click the Crop button. Now the signature selection appears by itself on the screen. |
Note:
The recommended size of the signature image is:
Width: 200-400 pixels
Height: 50-75 pixels
The size appears in the bottom of the window. In this example, the width is 602 pixels (px), and the height is 80 pixels.
|
j)
|
If the dimensions of your signature image are significantly different from the recommended, do one of the following: |
If the image has lots of "white space" around any of the sides of the signature, re-crop the image and then re-check the dimensions (cropping reduces the image dimensions).
If the dimensions are still significantly different from the recommended ones, resize the image. Click the Resize button, specify a value for horizontal and vertical size (not less than 50%) and click OK. Check the image's dimensions again. If they are still significantly different from the recommended ones, press Ctrl+Z to undo the resizing. Then repeat this step, but use a different resizing value.
|
k)
|
Once at the recommended size, save the images. Click the Paint button and click Save As. Save the file on the deskcop and save the signature as a graphic file (.png or .jpg) |
|
4.
|
Import the signature into Wolf EMR: |
|
a)
|
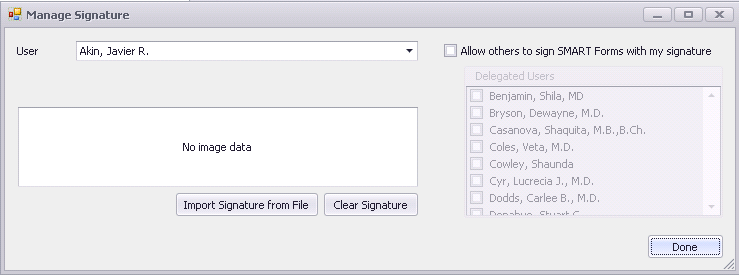
From the Wolf EMR Maintenance tab, click Configure My SMART Forms . |
|
b)
|
Click Manage Signature . The Manage Signature window opens. |
|
c)
|
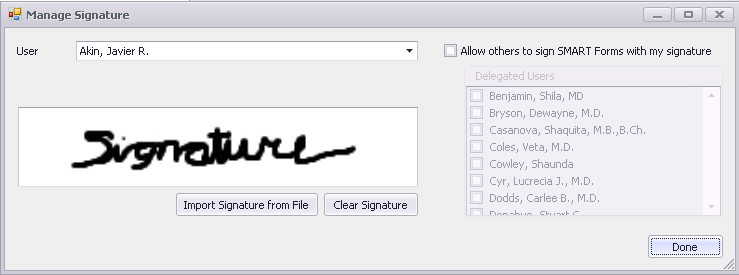
Click Import Signature from File and from your desktop, double-click the signature image file that you saved. |
A preview of the signature appears.
|
d)
|
Ensure that the signature is not cut off within the box. If it is, resize the image, as described in step 3. |
|
5.
|
Optionally, allow other users to use your signature: |
|
a)
|
If the Manage Signature window is not open, open it (see step 4). |
|
b)
|
Select the Allow others to sign SMART Forms with my signature check box. |
|
c)
|
In the Delegated Users box, select the users you allow to use your signature. |
|
6.
|
To remove or re-submit your signature: |
|
a)
|
If the Manage Signature window is not open, open it (see step 4). |
|
b)
|
Click Clear Signature. |