Creating follow-up tasks
Follow-up tasks are similar to messages in how they are created and used, however, they are created primarily to:
Instruct or remind a staff member or provider to call a patient or schedule a return appointment (recall).
Serve as a reminder in a patients record for a provider to talk to the patient about a particular test result, treatment option, lifestyle advice, or any other matter pertaining to the patient’s health.
Because follow-up tasks serve a specific function, they have fewer options than messages. For example:
Follow-up tasks cannot be sent to several users at once to complete individually. A follow-up task can only be sent to a single user, or to a group. As soon as one member of the recipient group views and completes the task, the task disappears from the follow-up list of all group members.
Follow-up tasks have fewer From options than messages. You cannot indicate that the message is originating from a patient, family member, consultant, or any other external source (unless written in the Follow-up Reason field).
Steps
| 1. | Start a follow-up from one of the following areas: |
| Area | Follow these steps... |
|---|---|
|
WorkDesk |
In the Follow Up Tasks area, click Enter New Follow-up To create a Follow-up regarding a patient, click Yes when prompted. The EMR displays the Patient Search window. Search for the patient and then, in the search results list, double-click the patient’s name. The EMR displays the Follow-ups window. |
|
Patient’s record |
On any window of the patient’s record (for example, the SOAP note, medical summary, or Patient tab), right-click and choose New Follow-up. |
|
Message |
Click Create New Follow Up Based on Message Example: A provider sends a message to front-end staff to contact a patient regarding an abnormal lab result. Front-end staff call the patient but they discover that the patient has gone overseas for 3 months. From the message, you create a follow-up task to call the patient, with a due date of 3 months from today. |
|
While reviewing new investigations and documents |
In the Investigations/Documents In Basket window, click Follow-up. |
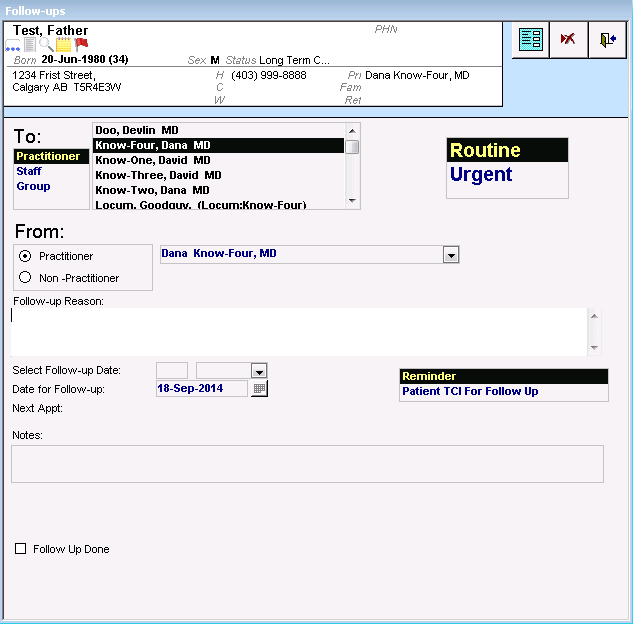
The Follow-ups window opens with:
The patient’s information displayed at the top of the window. Click to view detailed information about the patient.
Your name selected in the To list, by default.
Your name selected in the From list, by default.
The patient’s next booked appointment date/time displayed beside Next Appt.
Best practice: Always double check the SMART patient banner to ensure that you selected the correct patient. Once a follow-up task is saved, it is permanently associated with the selected patient’s chart (you cannot delete it).
| 2. | In the To area, choose the type of recipient you want to send the follow-up to. The EMR displays a list of associated users and user groups. |
The following table describes the user types available in the To list, and how they affect the user list you can choose from.
| Recipient type | Result |
|---|---|
|
Practitioner |
All providers. You can only choose one. |
|
Staff |
All MOAs and other front-end staff. You can only choose one. |
|
Group |
All messaging groups. For information on how to use and create messaging groups, see Creating security groups. If you send a follow-up task to a group, all users belonging to that group can view it. After one user completes the follow-up task, it disappears from the list of ALL group members. If you want each user in the group to view and complete the task individually, instead create a message. |
| 3. | Click the user or user group you want to send the task to. |
| 4. | To send the task on behalf of someone else, in the From area, click the type of sender and in the list to the right of the From list, choose the sender’s name. |
| 5. | In the Priority list, click one of the following options: |
Routine: The EMR displays the task at the bottom of the recipient’s follow-up list.
Urgent: The EMR displays the task first and in red in the recipient’s follow-up list, with an exclamation mark(!) in the first column.
Best practice: Only mark follow ups as Urgent if they must be addressed immediately.
| 6. | In the Follow Up Reason area, type the details of the task. |
| 7. | By default, the due date is today. To specify another date, complete one of the following actions: |
To set due date for a specific number of days, weeks, or months in the future, in the Select Follow-up Date field, type the number and choose the time unit. The Date for Follow Up is automatically calculated.
To set a specific due date, in the Date for Follow Up field, type a date or click the calendar ![]() .
.
| 8. | In the follow-up type list to the right of the date, click Reminder. |
| 9. | In the Notes area, type the details of any actions you took toward completing the task. For example, “Informed patient during their visit that an MOA will contact them to book an appointment if results are abnormal” |
| 10. | Click Save & Close |
© 2018 ![]()